
BlueMap : A next generation mapviewer
Following the Overviewer project on mTxServ, BlueMap allows to get 3D render of your worlds to make them viewable through a web browser.
Why BlueMap ?
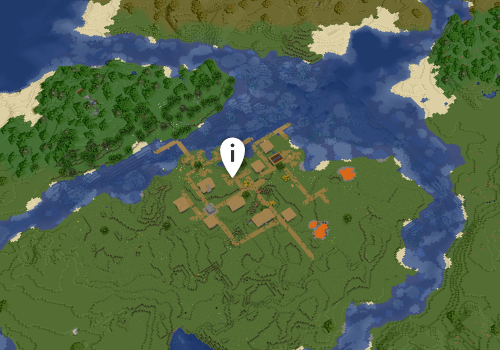
Giving many features with excellent performances, BlueMap will allow you to view all your maps through your web browser, just like if you were there !
Indeed, multiple view mods are available, an usual 2D view and a 3D view like in creative mode !


Credits : Play-MC server, mTxServ's partner
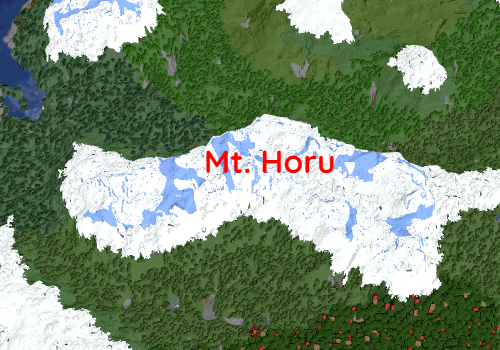
You can notice on the second image, the far away landscapes are poorly rendered to minimize your computer's load.
If you're not convinced, you can check this demo map : https://bluecolored.de/bluemap
BlueMap on mTxServ
ATTENTION : BlueMap is available instead of Overviewer for Minecraft servers since 1.12.2 version (the 1.5.5 version of BlueMap for 1.12.2 isn't fully stable and some features won't be available).
When your server is active, a render of all your maps are done every 2 hours. You can get your BlueMap URL like https://game-x-y.mtxserv.com/bluemap/serveurXXX/.
Mods and resources are automatically copied to the directory bluemap/config/resourcepacks, it will also include modded dimensions like Twilight Forest.
With the default configuration, live position of players is not available.
If you have some display issues or some maps aren't rendered, please contact support !
FTP & Configuration
BlueMap files are stored in minecraft/bluemap directory.
You can edit maps configuration (they are automatically created if they don't exist yet).
To reset map's render (for example to fix a visual bug), you can just remove the render directory in minecraft/bluemap/maps/MAP_NAME.
Add markers
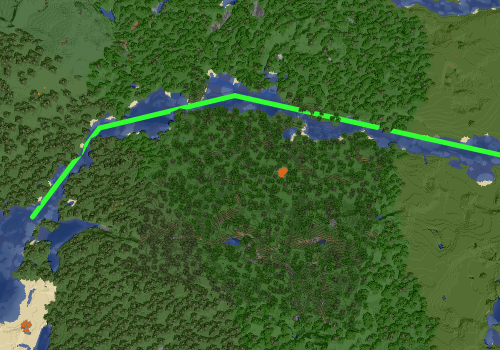
You can add markers to show cities' borders or give a name to some map area. They'll be displayed on map and on the Markers menu.
There are multiple markers' type, but before taking a look at them, let's go to the FTP. You'll find your maps configurations' file there (DIM-1 is Nether, DIM1 the Ender) :

For example click on world.conf and see at the bottom of the file to add markers just like these (you can copy-paste all the given code below) :
# Here you can define any static marker-sets with markers that should be displayed on the map.
# You can change this at any time.
# If you need dynamic markers, you can use any plugin that integrates with BlueMap's API.
# Here is a list: https://bluemap.bluecolored.de/community/3rdPartySupport.html
marker-sets: {

    # Please check out the wiki for information on how to configure this:
    # https://bluemap.bluecolored.de/wiki/customization/Markers.html
    markers-group: {
        label: "Markers group example"
        toggleable: true
        default-hidden: false
        sorting: 0
        markers: {
            marker-example: {
                type: "poi"
                position: { x: -54, y: 87, z: 130 }
                label: "POI example"

                # Optional:
                detail: "This is a marker<b>POI</b>"
                icon: "assets/poi.svg"
                sorting: 0
                listed: true
                min-distance: 10
                max-distance: 10000000
            }

            marker-example-html: {
                type: "html"
                position: { x: 1, y: 64, z: -23 }
                label: "Example HTML Marker"
                html: "<div style='line-height: 2em; font-size: 2em; color: white; transform: translate(-50%, -50%);'>Example HTML Marker</div>"

                # Optional:
                sorting: 0
                listed: true
                min-distance: 10
                max-distance: 10000000
            }

            marker-line-example: {
                type: "line"
                position: { x: 1, y: 64, z: -25 }
                label: "Example Marker Line"
                line: [
                    { x: 1, y: 64, z: -23 }
                    { x: 1, y: 64, z: -24 }
                    { x: 1, y: 64, z: -25 }
                    { x: 2, y: 64, z: -25 }
                    { x: 3, y: 64, z: -25 }
                ]

                # Optional:
                detail: "This is a <b>line</b> marker"
                link: null
                new-tab: false
                depth-test: false
                line-width: 5
                line-color: { r: 255, g: 0, b: 0, a: 1.0 }
                sorting: 0
                listed: true
                min-distance: 10
                max-distance: 10000000
            }

            marker-form-example: {
                type: "shape"
                position: { x: 1, y: 64, z: -23 }
                label: "Example Shape Marker"
                shape: [
                    { x: 1, z: -23 }
                    { x: 1, z: -24 }
                    { x: 1, z: -25 }
                    { x: 2, z: -25 }
                    { x: 3, z: -25 }
                ]
                shape-y: 64

                # Optional:
                detail: "This is a <b>shape</b> marker"
                link: null
                new-tab: false
                depth-test: false
                line-width: 5
                line-color: { r: 255, g: 0, b: 0, a: 1.0 }
                fill-color: { r: 200, g: 0, b: 0, a: 0.3 }
                sorting: 0
                listed: true
                min-distance: 10
                max-distance: 10000000
            }

            extrude-marker-example: {
                type: "extrude"
                position: { x: 1, y: 64, z: -23 }
                label: "Example Extrude Marker"
                shape: [
                    { x: 1, z: -23 }
                    { x: 1, z: -24 }
                    { x: 1, z: -25 }
                    { x: 2, z: -25 }
                    { x: 3, z: -25 }
                ]
                shape-min-y: 47
                shape-max-y: 72

                # Optional:
                detail: "This is a <b>extrude</b> marker"
                link: null
                new-tab: false
                depth-test: true
                line-width: 5
                line-color: { r: 255, g: 0, b: 0, a: 1.0 }
                fill-color: { r: 200, g: 0, b: 0, a: 0.3 }
                sorting: 0
                listed: true
                min-distance: 10
                max-distance: 10000000
            }


        }
    }

}
This example contains a marker of each type :
- POI : An image that display text once clicked
- HTML : Allows you to add text, image, button or video
- Lline : For example to make a border, you can indicate
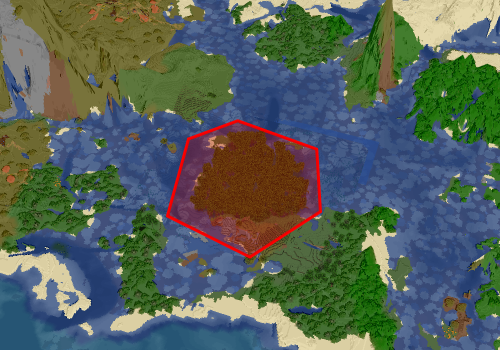
shapewith point that will be linked following their order - Shape : Similar to line marker except that last point will be linked to first and the internal surface will be colored. Practical to show a zone.
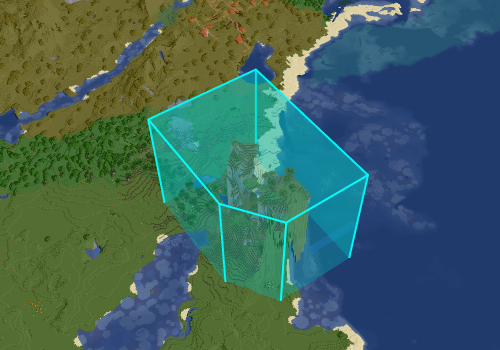
- Extrude : Similar to shape marker except that it can show a zone with altitude
POI
Here is the code to add a simple marker called POI.
           exemple-marqueur: {
                type: "poi"
                position: { x: -54, y: 87, z: 130 }
                label: " POI Marker example"

                # Optional:
                detail: "This is a Marker <b>POI</b>"
                icon: "assets/poi.svg"
                sorting: 0
                listed: true
                min-distance: 10
                max-distance: 10000000
            }
-
Position : XYZ value where you marker will appear
-
Label : Marker's name
-
Detail : Text that will be displayed once the marker is clicked
-
Icon : Path to the image used for marker
More informations here : https://bluemap.bluecolored.de/wiki/customization/Markers.html#poi-markers
HTML
            html-marker-example: {
                type: "html"
                position: { x: 1, y: 64, z: -23 }
                label: "Example HTML Marker"
                html: "<div style='line-height: 2em; font-size: 2em; color: white; transform: translate(-50%, -50%);'>Example HTML Marker</div>"

                # Optional:
                sorting: 0
                listed: true
                min-distance: 10
                max-distance: 10000000
            }
- Position : XYZ value where you marker will appear
- Label : Marker's name
- Html : Specifiy the HTML code to customize your marker
More informations here : https://bluemap.bluecolored.de/wiki/customization/Markers.html#html-markers
Line
           line-marker-example: {
                type: "line"
                position: { x: 1, y: 64, z: -25 }
                label: "Example Line Marker"
                line: [
                    { x: 1, y: 64, z: -23 }
                    { x: 1, y: 64, z: -24 }
                    { x: 1, y: 64, z: -25 }
                    { x: 2, y: 64, z: -25 }
                    { x: 3, y: 64, z: -25 }
                ]

                # Optional:
                detail: "This is a <b>line</b> marker"
                link: null
                new-tab: false
                depth-test: false
                line-width: 5
                line-color: { r: 255, g: 0, b: 0, a: 1.0 }
                sorting: 0
                listed: true
                min-distance: 10
                max-distance: 10000000
            }
-
Position : XYZ value where you marker will appear
-
Label : Marker's name
-
Line : Every points you want to link together. Add a
{ x: 4, y: 64, z: -25 }element after returning a new line to add a point -
Detail : Text that will be displayed once marker is clicked
-
Link : Optional link that will be opened once clicked
-
New-tab : If the
linkis clicked, it'll be opened in a new tab -
Line-color : To choose the points and lines colors (r for red, g for green, b for blue and a for opacity)
More informations here : https://bluemap.bluecolored.de/wiki/customization/Markers.html#line-markers
Shape
           shape-marker-example: {
                type: "shape"
                position: { x: 1, y: 64, z: -23 }
                label: "Example Shape Marker"
                shape: [
                    { x: 1, z: -23 }
                    { x: 1, z: -24 }
                    { x: 1, z: -25 }
                    { x: 2, z: -25 }
                    { x: 3, z: -25 }
                ]
                shape-y: 64

                # Optional:
                detail: "This is a <b>shape</b> marker"
                link: null
                new-tab: false
                depth-test: false
                line-width: 5
                line-color: { r: 255, g: 0, b: 0, a: 1.0 }
                fill-color: { r: 200, g: 0, b: 0, a: 0.3 }
                sorting: 0
                listed: true
                min-distance: 10
                max-distance: 10000000
            }
-
Position : XYZ value where you marker will appear
-
Label : Marker's name
-
Shape : Every point you want to link together. Add a
{ x: 4, z: -25 }element after returning a new line to add a point -
Shape-y : The height of your shape
-
Detail : Text that will be displayed once marker is clicked
-
Link : Optional link that will be opened once marker is clicked
-
New-tab : If the
linkis clicked open in a new tab -
Line-color : To choose the points and lines colors (r for red, g for green, b for blue and a for opacity)
-
Fill-color : La couleur avec laquelle votre forme doit être remplie
Plus d'infos ici : https://bluemap.bluecolored.de/wiki/customization/Markers.html#shape-markers
Extrude
           example-extrude-marker: {
                type: "extrude"
                position: { x: 1, y: 64, z: -23 }
                label: "Example Extrude Marker"
                shape: [
                    { x: 1, z: -23 }
                    { x: 1, z: -24 }
                    { x: 1, z: -25 }
                    { x: 2, z: -25 }
                    { x: 3, z: -25 }
                ]
                shape-min-y: 47
                shape-max-y: 72

                # Optional:
                detail: "This is a <b>extrude</b> marker"
                link: null
                new-tab: false
                depth-test: true
                line-width: 5
                line-color: { r: 255, g: 0, b: 0, a: 1.0 }
                fill-color: { r: 200, g: 0, b: 0, a: 0.3 }
                sorting: 0
                listed: true
                min-distance: 10
                max-distance: 10000000
            }
-
Position : XYZ value where you marker will appear
-
Label : Marker's name
-
Shape : Every points you want to link together. Add a
{ x: 4, z: -25 }element after returning a new line to add a point -
Shape-min-y : Minimal height of your shape
-
Shape-max-y : Maximal height of your shape
-
Detail : Text that will be displayed once marker is clicked
-
Link : Optional link that will be opened once marker is clicked
-
New-tab : If the
linkis clicked open in a new tab -
Line-color : To choose the points and lines colors (r for red, g for green, b for blue and a for opacity)
-
Fill-color : The color that will be used to fill the shape
More informations here : https://bluemap.bluecolored.de/wiki/customization/Markers.html#extrude-markers