Pterodactyl is a free and open-source management panel for game servers. Built with PHP 7, Nodejs and Go, it runs your servers in isolated Docker containers, while providing a complete interface.
This panel is one of the best on the market if you can't develop your own solution. It is also used by several French hosting companies, who resell this solution (unlike mTxServ which has developed its own panel with exclusive functions, for its game server offers).
In this tutorial, we will see how to install and use the Pterodactyl panel on your Virtual Private Server.
Supported games on Pterodactyl
The panel is compatible with a wide variety of games:
- Minecraft / Minecraft Bedrock
- Rust
- Terraria
- Team Fortress 2
- Counter-Strike: Global Offensive
- Garry's Mod
- ARK: Survival Evolved
- FiveM
- Discord ATLBot
- And many others !
You can also create voice servers:
- Teamspeak
- Mumble
Panel dependencies
Pterodactyl is compatible with :
- Debian 9 / Debian 10
- Ubuntu 18.04 / 20.04
- CentOS 8 / CentOS 9
In this tutorial, we will deal with the installation only on Debian.
Installation of Pterodactyl
Installation of the Operating System
If your VPS is already installed on Debian, you can skip this step.
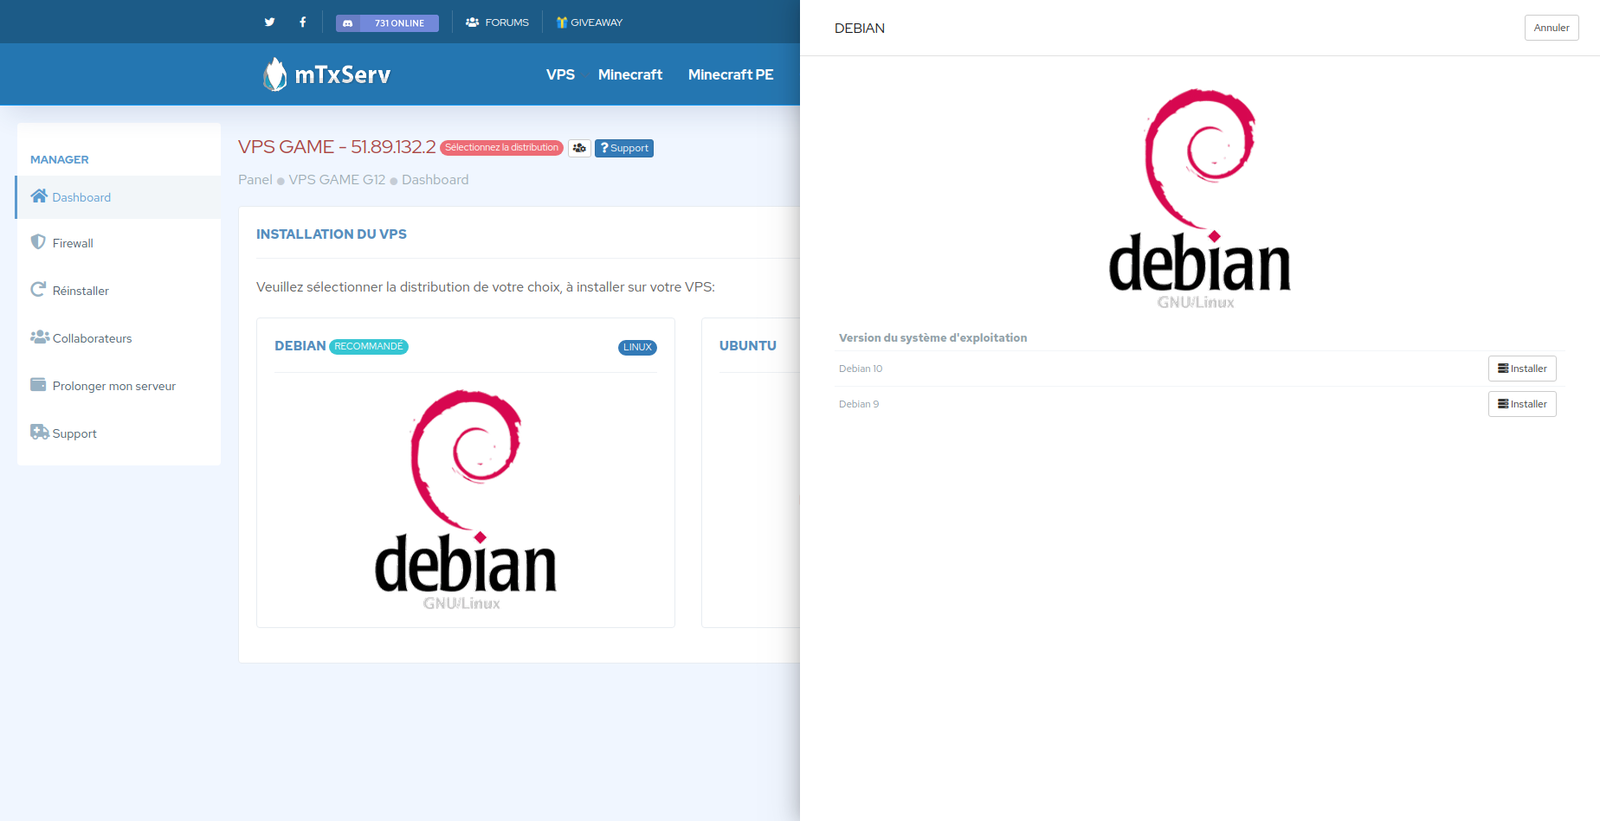
If not, here is how to install your VPS:
- Go to your Management Panel,
- Select the distribution
Debian, - Choose version
Debian 10and click onInstall, - Click on
Confirm l'installationand wait, - You will receive your identifiers by e-mail at the end of the installation.
Installation of dependencies
Let's go for the installation of the dependencies necessary for the proper functioning of the Pterodactyl panel.
WARNING: All the following commands must be entered as administrator.
Before we jump in without thinking, you should know that Pterodactyl requires virtualization to be active. On a VPS hosted by mTxServ, you will have no problem. If you still want to check before you start the installation, enter the command lscpu | grep 'vendor\|type'which must not return an error. You should see something like:
Hypervisor vendor:   KVM
Virtualization type: full
If the virtualization is active, you can start the installation of the dependencies (applications, PHP, web server, ...):
apt update
apt -y install software-properties-common curl apt-transport-https ca-certificates gnupg sudo php7.3 php7.3-{cli,gd,mysql,pdo,mbstring,tokenizer,bcmath,xml,fpm,curl,zip} nginx tar unzip git
We now install composer :
curl -sS https://getcomposer.org/installer | php -- --install-dir=/usr/local/bin --filename=composer
We also need NodeJS
curl -sL https://deb.nodesource.com/setup_14.x | bash -
apt update
apt -y install nodejs make gcc g++
And finally, we need Docker :
curl -sSL https://get.docker.com/ | CHANNEL=stable bash
usermod -aG docker www-data
systemctl enable --now docker
/etc/init.d/docker restart
We can now proceed to the installation and the database configuration:
Installation of the Database
To go to the panel, we need to install first the database
apt -y install mariadb-server
NOTE:
MariaDB* is an optimized version of MySQL. It is fully compatible with MySQL and improves the performance significantly, that's why we will focus on its use in this tutorial.
You still have to configure and secure the SQL server.
We will now create a specific user for the panel in the SQL server. Enter the command below to enter the administration tool, and enter your password:
mysql -u root -p mysql
Now that we are in the SQL Server management tool, let's create a new user to secure the panel.
Don't forget to change YOUR_PASSWORD with the password you want for this user:
CREATE USER 'pterodactyl'@'127.0.0.1' IDENTIFIED BY 'YOUR_PASSWORD';
Now that we have our user, let's create the database and add permissions to the user:
CREATE DATABASE panel;
GRANT ALL PRIVILEGES ON panel.* TO 'pterodactyl'@'127.0.0.1' WITH GRANT OPTION;
FLUSH PRIVILEGES;
Panel Installation
Our VPS is ready to install the Pterodactyl panel, which will then allow you to create and administer your game servers.
In order to avoid any security issues, we will install and launch the panel with the user www-data, which is already present on our VPS:
chown -R www-data:www-data /var/www
su -l www-data -s /bin/bash
Now that we are on the right user, the first step is to create the folder where the panel will be added:
mkdir -p /var/www/pterodactyl
cd /var/www/pterodactyl
Once you have created a new directory, you need to download the files and unpack the archive. Finally, we will change the rights on the directories.
curl -Lo panel.tar.gz https://github.com/pterodactyl/panel/releases/download/v1.0.3/panel.tar.gz
tar -xzvf panel.tar.gz
chmod -R 755 storage/* bootstrap/cache/
Now that all the files have been uploaded, we need to configure it. We will create the file containing the environment settings, install the PHP dependencies and generate a new encryption key for the application.
cp .env.example .env
composer install --no-dev --optimize-autoloader
php artisan key:generate --force
Let's initialize the configuration with the following command:
php artisan p:environment:setup
- Egg Author Email <- Your email adress
-
Application URL <- The IP address of your server with http before, example:
http://51.89.132.2. -
Application Timezone <- Choose your Timezone, example:
Europe/Paris -
Cache Driver <- Enter
file. -
Session Driver <- Enter
database. -
Queue Driver <- Enter
database. -
Enable UI based settings editor? <- Enter
yes.
Let's move on to the initialization of the database parameters:
php artisan p:environment:database
-
Database Host <- Enter
127.0.0.1 -
Database Port <- Enter
3306 -
Database Name <- Enter
panel -
Database Username <- Enter
pterodactyl -
Database Password <- Enter the user's password
pterodactyl, that you have configured above, in Database installation.
Warning: Back up your encryption key (APP_KEY dans le fichier .env). It is used as an encryption key for all data that must be stored securely (API Key by example) If you lose the key, you will lose all encrypted data even if you have database backups.
Now we need to configure all the basic panel data. The command below may take some time to run depending on your VPS, please DO NOT exit the process until it is complete!
php artisan migrate --seed
The basic configuration is in place, we will create our user who will connect to the panel, with the following command:
php artisan p:user:make
-
Is this user an administrator? (yes/no) <-- Enter
yes - Email Adress <-- Your email address
-
Username <- Write your username, by example
JDoe - First Name <- Enter your first name
- Last Name <- Enter your last name
- Password <- Your password which will be used on your account
The result will sounds like:
+----------+--------------------------------------+
| Field    | Value                                |
+----------+--------------------------------------+
| UUID     | 786a13ee-4bfa-43ef-af3d-a868077be3bc |
| Email    | adress@mail.com                       |
| Username | JDoe                                  |
| Name     | John Doe                              |
| Admin    | Yes                                  |
+----------+--------------------------------------+
Your user to connect to the panel is ready.
To finalize the installation, we must quit the user www-data, to return to the user root. Next, we will make sure that the file permissions are correct:
exit
chown -R www-data:www-data /var/www/pterodactyl/
We are at the end of the installation of the panel, we just have to add the system allowing to execute the actions in the background:
echo "* * * * * www-data php /var/www/pterodactyl/artisan schedule:run >> /dev/null 2>&1" >> /etc/crontab
We now create the associated service:
echo "[Unit]
Description=Pterodactyl Queue Worker

[Service]
User=www-data
Group=www-data
Restart=always
ExecStart=/usr/bin/php /var/www/pterodactyl/artisan queue:work --queue=high,standard,low --sleep=3 --tries=3

[Install]
WantedBy=multi-user.target" > /etc/systemd/system/pteroq.service
Then we activate it:
systemctl enable --now pteroq.service
Last step, the configuration of the webserver nginx:
Create a file on /etc/nginx/sites-available/pterodactyl.conf, by example with nano(nano /etc/nginx/sites-available/pterodactyl.conf, and add the following content:
server {
    listen 80 default_server;
    server_name _;

    root /var/www/pterodactyl/public;
    index index.html index.htm index.php;
    charset utf-8;

    location / {
        try_files $uri $uri/ /index.php?$query_string;
    }

    location = /favicon.ico { access_log off; log_not_found off; }
    location = /robots.txt  { access_log off; log_not_found off; }

    access_log off;
    error_log  /var/log/nginx/pterodactyl.app-error.log error;

    # allow larger file uploads and longer script runtimes
    client_max_body_size 100m;
    client_body_timeout 120s;

    sendfile off;

    location ~ \.php$ {
        fastcgi_split_path_info ^(.+\.php)(/.+)$;
        fastcgi_pass unix:/run/php/php7.3-fpm.sock;
        fastcgi_index index.php;
        include fastcgi_params;
        fastcgi_param PHP_VALUE "upload_max_filesize = 100M \n post_max_size=100M";
        fastcgi_param SCRIPT_FILENAME $document_root$fastcgi_script_name;
        fastcgi_param HTTP_PROXY "";
        fastcgi_intercept_errors off;
        fastcgi_buffer_size 16k;
        fastcgi_buffers 4 16k;
        fastcgi_connect_timeout 300;
        fastcgi_send_timeout 300;
        fastcgi_read_timeout 300;
    }

    location ~ /\.ht {
        deny all;
    }
}
Let's activate the website of the panel we just added on the web server, and delete the default configuration:
rm /etc/nginx/sites-enabled/default
ln -s /etc/nginx/sites-available/pterodactyl.conf /etc/nginx/sites-enabled/pterodactyl.conf
/etc/init.d/nginx restart
If needed, you can consult the panel logs in /var/log/nginx/pterodactyl.app-error.log and /var/www/pterodactyl/storage/logs/.
And that's it, the Pterodactyl panel is installed on your VPS! To go further in the configuration, check the official doc.
To connect to the panel, open your browser, and go to http://MY_IPADRESS/ (don't forget to replace the IP with the IP of your server like: http://51.89.132.2). The username and password come from what you entered when you used the php artisan p:user:make.
Installation & Configuration of Wings
Now that the panel is ready, we still have to initialize the data in the panel administration, to finalize the installation of Wings (which allows the panel to communicate with the game servers).
To install Wings, enter the following commands as root:
mkdir -p /etc/pterodactyl
curl -L -o /usr/local/bin/wings https://github.com/pterodactyl/wings/releases/download/v1.0.1/wings_linux_amd64
chmod u+x /usr/local/bin/wings
Next, we will initialize the data in the panel. Log in to Pterodactyl and go to the administration options :

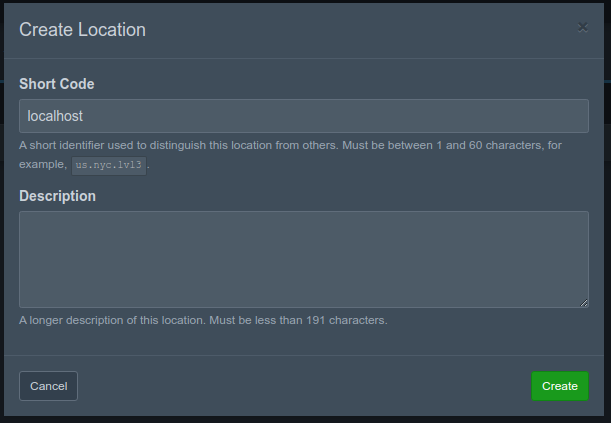
We will first declare a new location, necessary to initialize the configuration of Wings:
- Go to
Locations. - Then
Create New. - In
Short Code, enterlocalhost. - Save & click on
Create.
Then, create the Node :
- Go on
Nodes. - Click on
Create New. - In
name, enternode1. - In
FQDN, put your VPS IP adress, by example51.89.132.2. - In
Communicate Over SSL, selectUse HTTP Connection. - In
Daemon Server File Directory, enter/var/www/daemon-data. - In
Total Memory, specify total RAM on your VPS in Mo. In my case, i have 8Go, so 8 * 1024 =8192. - In
Memory Over-Allocation, enter0. - In
Total Disk Space, indicate the disk space reserved for your game servers on the VPS, in MB. For example for 40 GB, 40 * 1024 =40960. - In
Disk Over-Allocation, enter0. - Save the node by clicking on
Create.
We can now import the configuration of the node into Wings. Click on Configuration :

Now copy the contents of Configuration File, and add it to a file /etc/pterodactyl/config.yml :
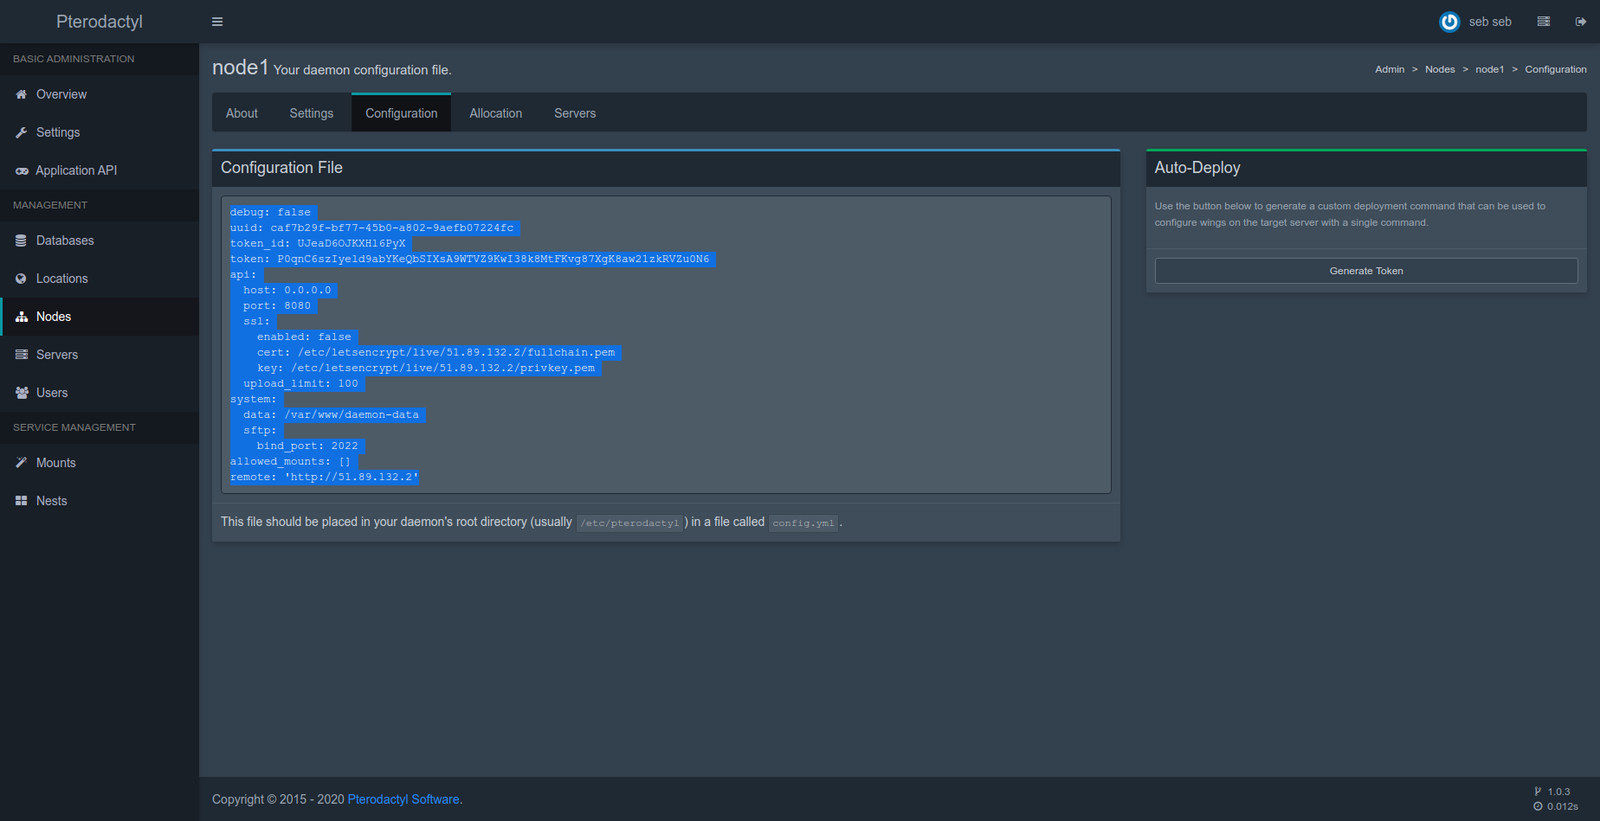
If the content of your /etc/pterodactyl/config.yml file is ok, we can create the Wings service:
echo "[Unit]
Description=Pterodactyl Wings Daemon

[Service]
User=root
WorkingDirectory=/etc/pterodactyl
LimitNOFILE=4096
PIDFile=/var/run/wings/daemon.pid
ExecStart=/usr/local/bin/wings
Restart=on-failure
StartLimitInterval=600

[Install]
WantedBy=multi-user.target" > /etc/systemd/system/wings.service
Then we activate it:
systemctl enable --now wings
service wings restart
You can verify that Wings is working properly by checking the log file /var/log/pterodactyl/wings.log.
And that's it, the panel is now ready to work at 100%.
IP allocation and ports
Before we can create our first game server, we need to configure the IP address that will be used, as well as the available ports.
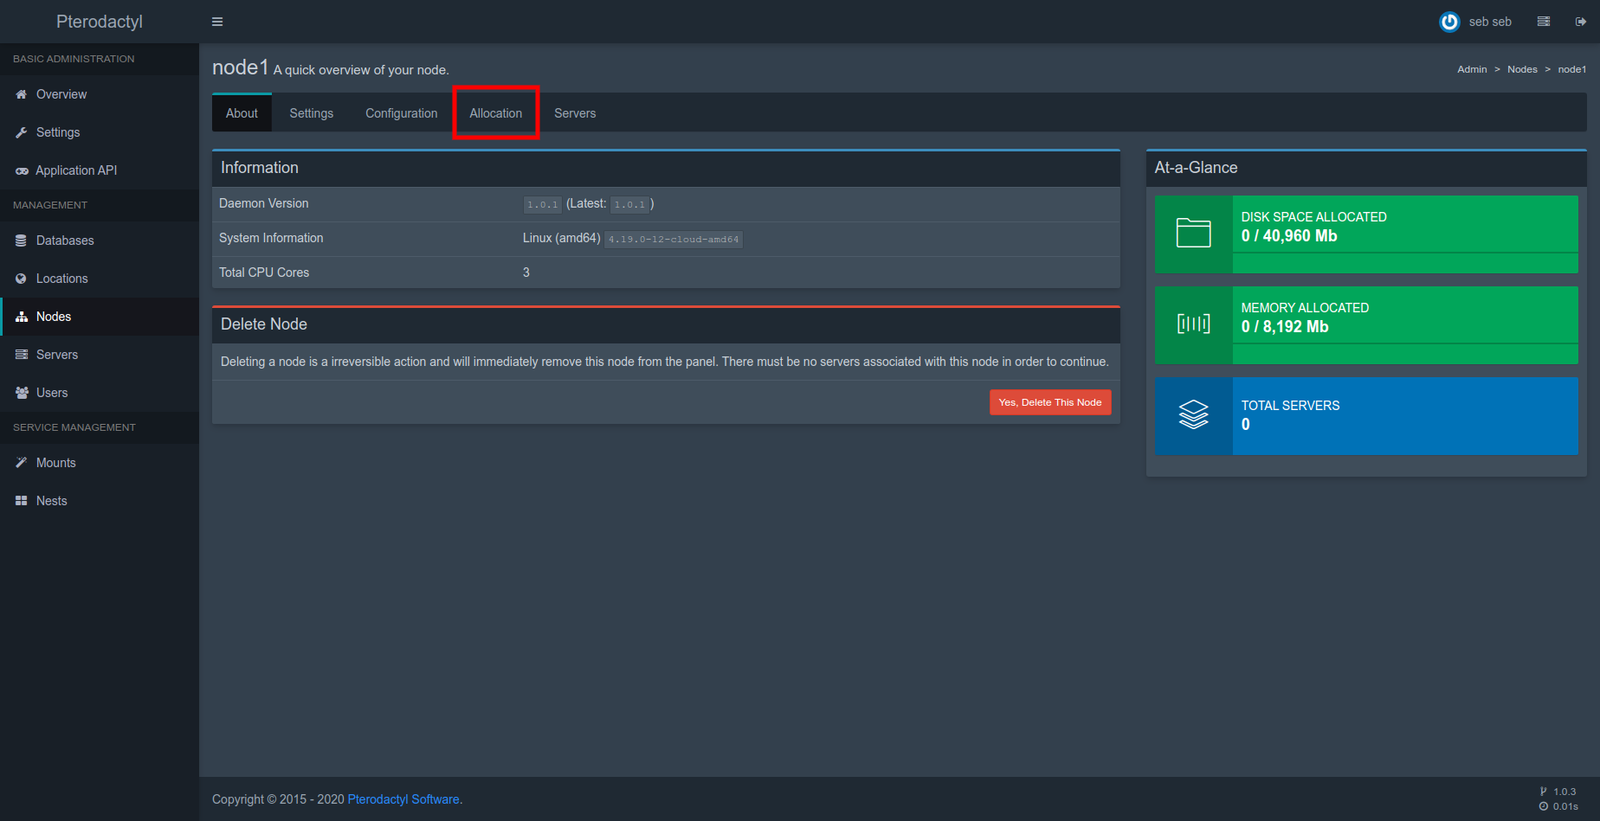
To do this:
- Click on
Nodesin the navigation, and selectnode1. - Then click on
Allocation.
You should see that:
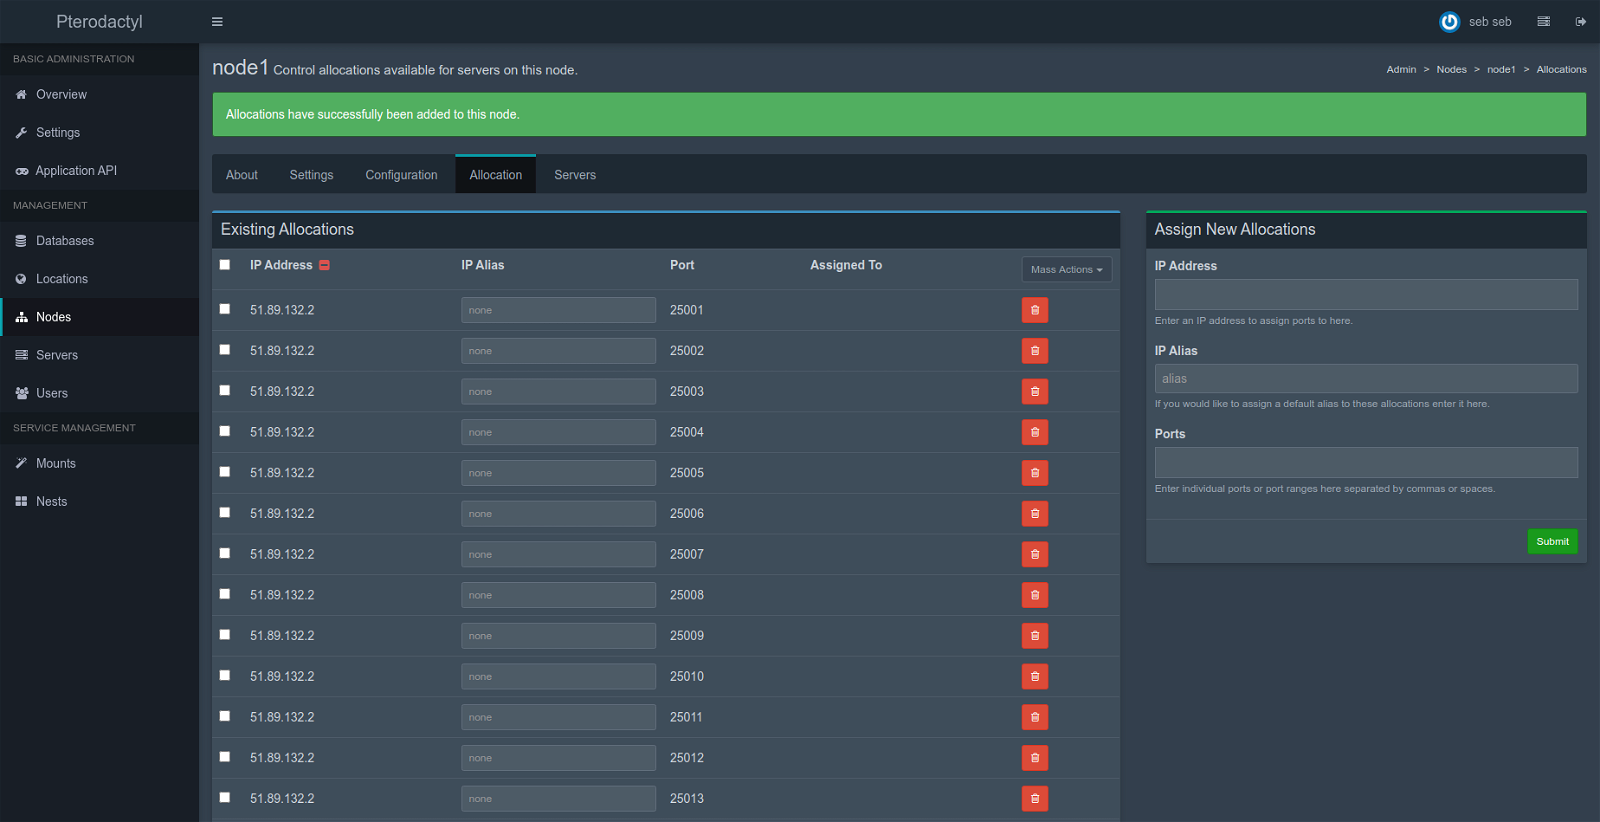
Let's declare our IP and ports available for creating game servers in the Assign New Allocations section:
- In
IP Address, enter the IP Adress of your VPS, by example:51.89.132.2. - In
Port, indicate the available ports to create your game servers later. You can enter a row of ports, for example:25001-25565. - Click on
Submit.
And that's it, we have finished the configuration, we just have to create our game servers and enjoy the panel ;)
Our first Game Server
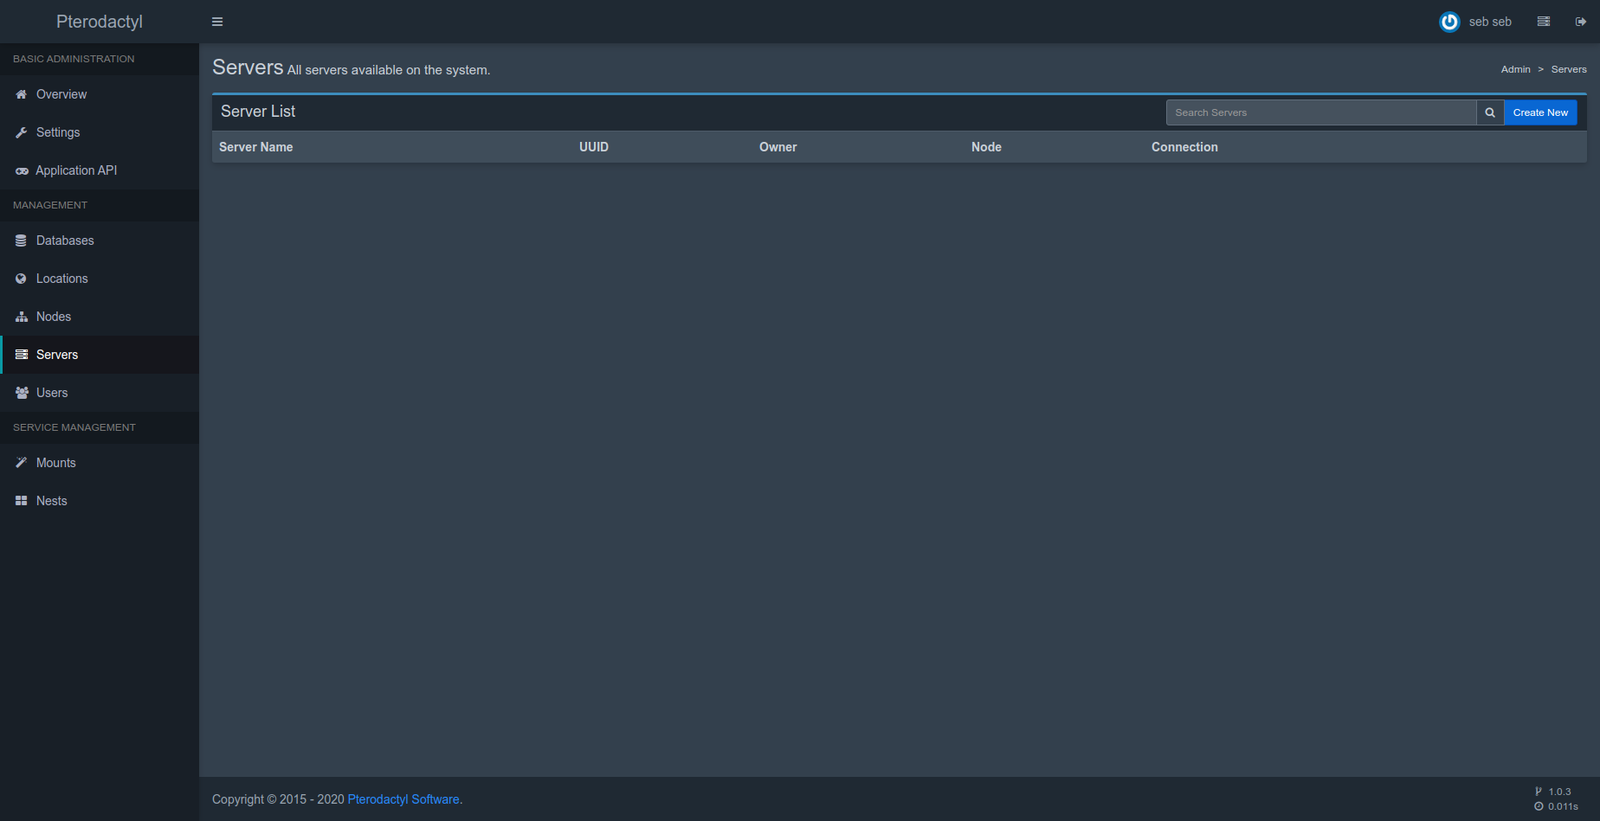
Everything is ready, let's go to the creation of a game server.
Go to the servers tab of the panel:
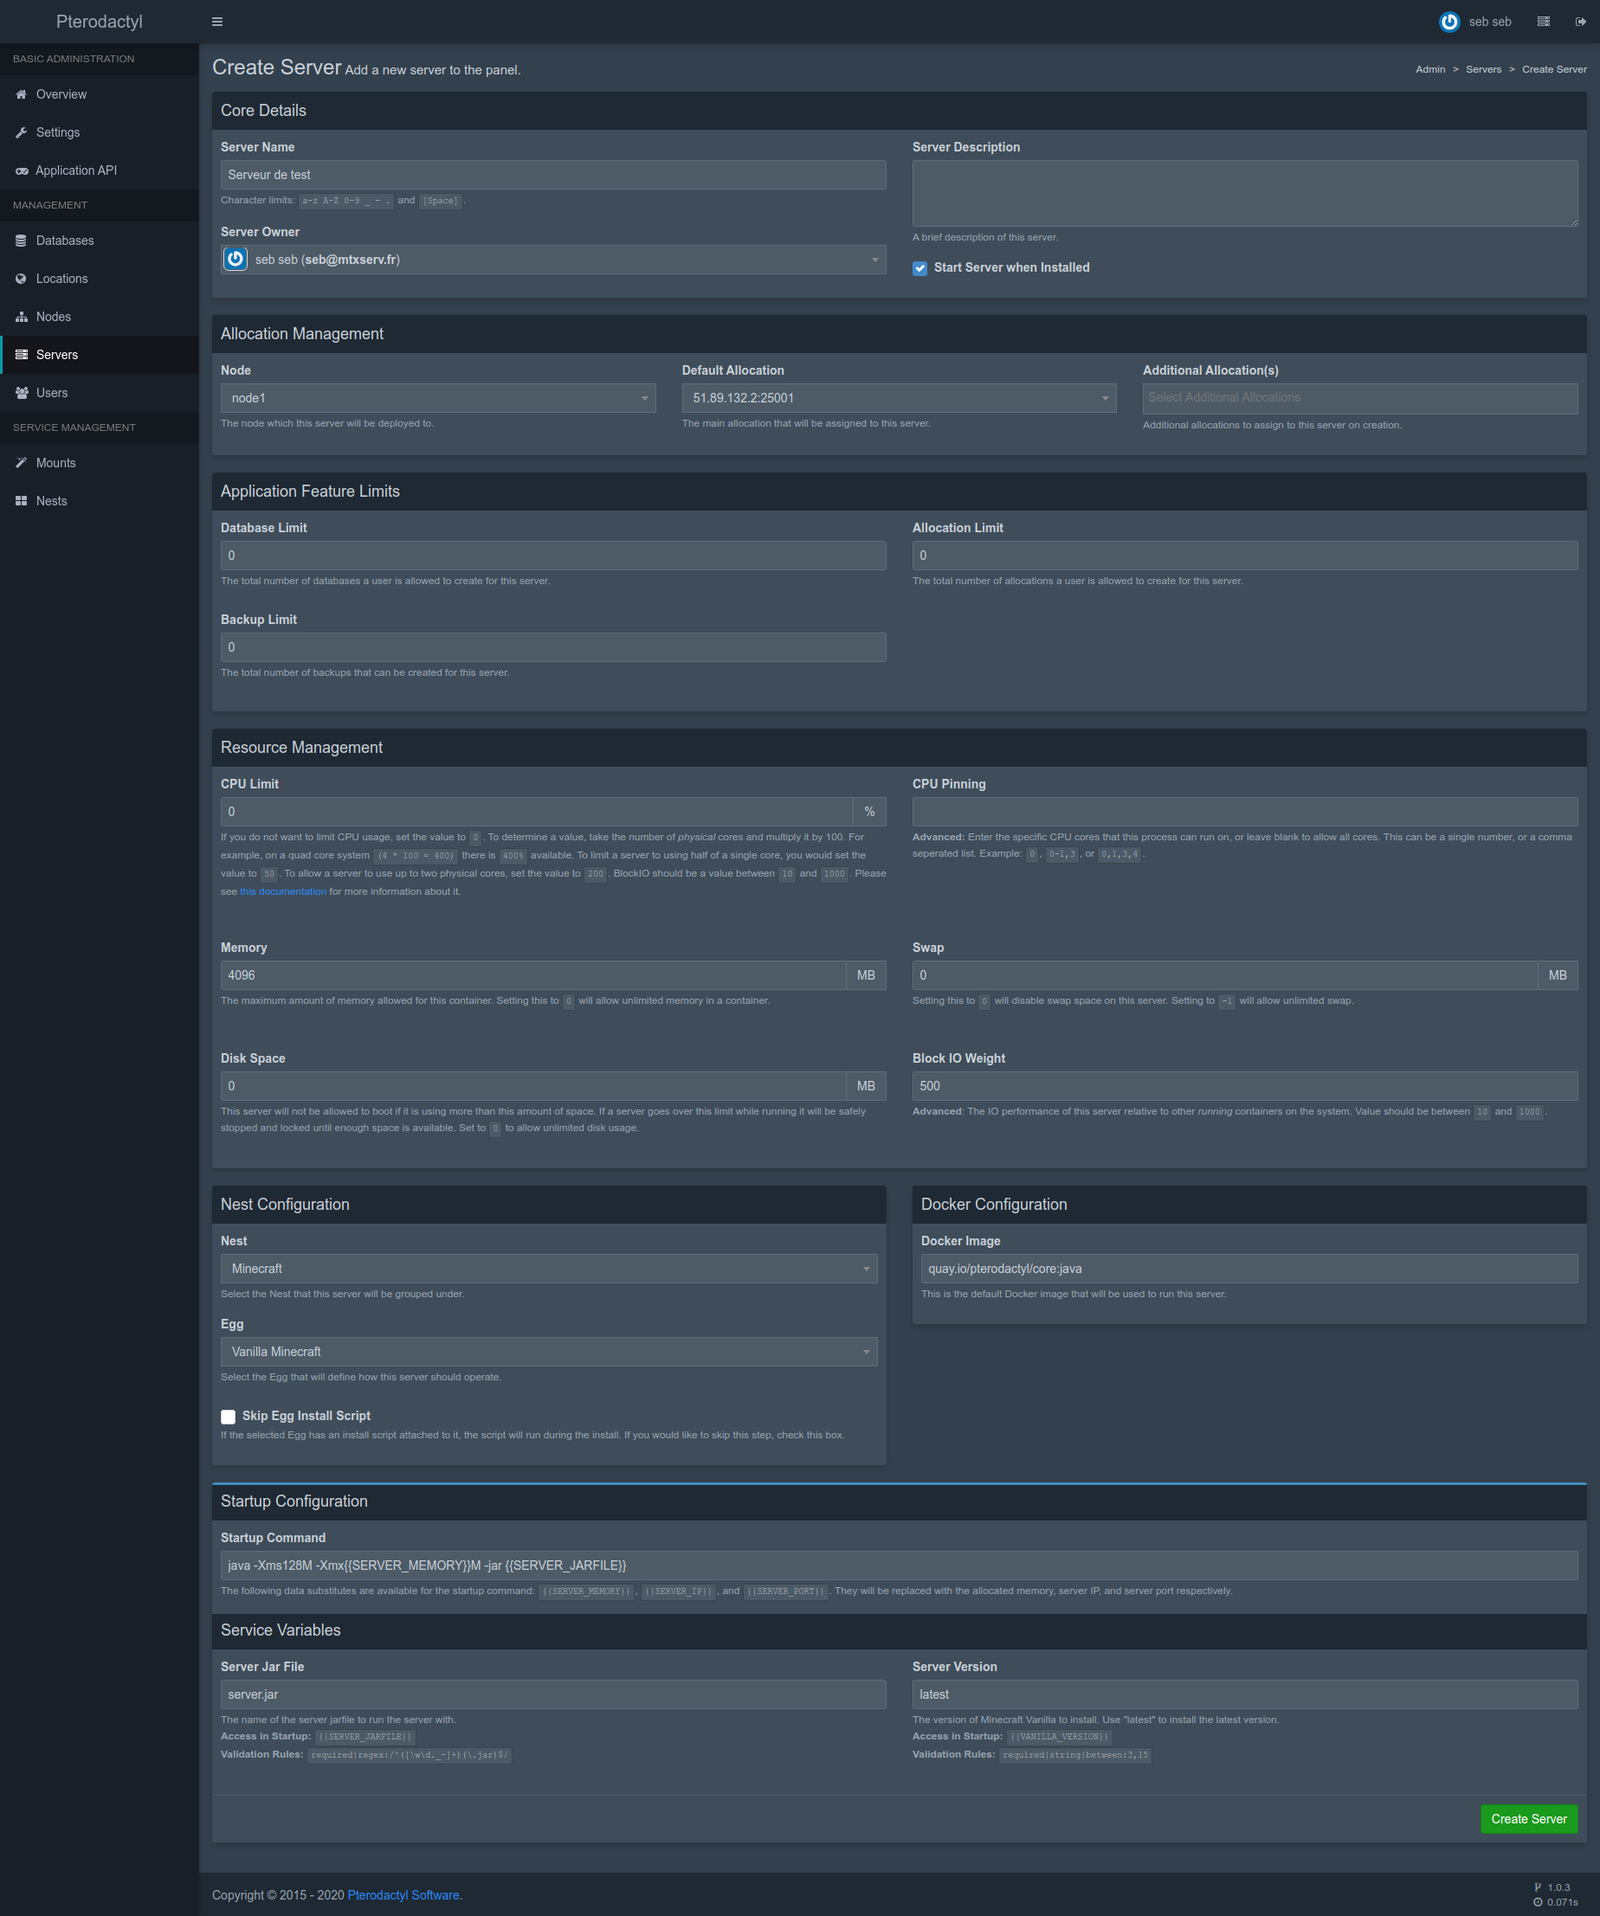
To create a new game server:
- Click on
Create New. - In
Server Name, enter the name of the server, for exampleTest Server. - In
Server Owner, enter the name of the user account that will own the server on the panel, in my caseSeb. - In
Default Allocation, select the port that will be used for the game server. - In
Memory, specify the RAM allocated to your Minecraft server. For our example, we will allocate4096MB. - In
Disk Space, you can specify the maximum disk space of the server, we advise you to enter-1to disable it. - In
Nest Configuration, select the game family in theNestfield, and the version you want to use inEgg. For our example, we will selectMinecraftandMinecraft Vanilla. - In
Server Version, you can specify the version you want. - Click
Create Serverto create your first game server on Pterodactyl!
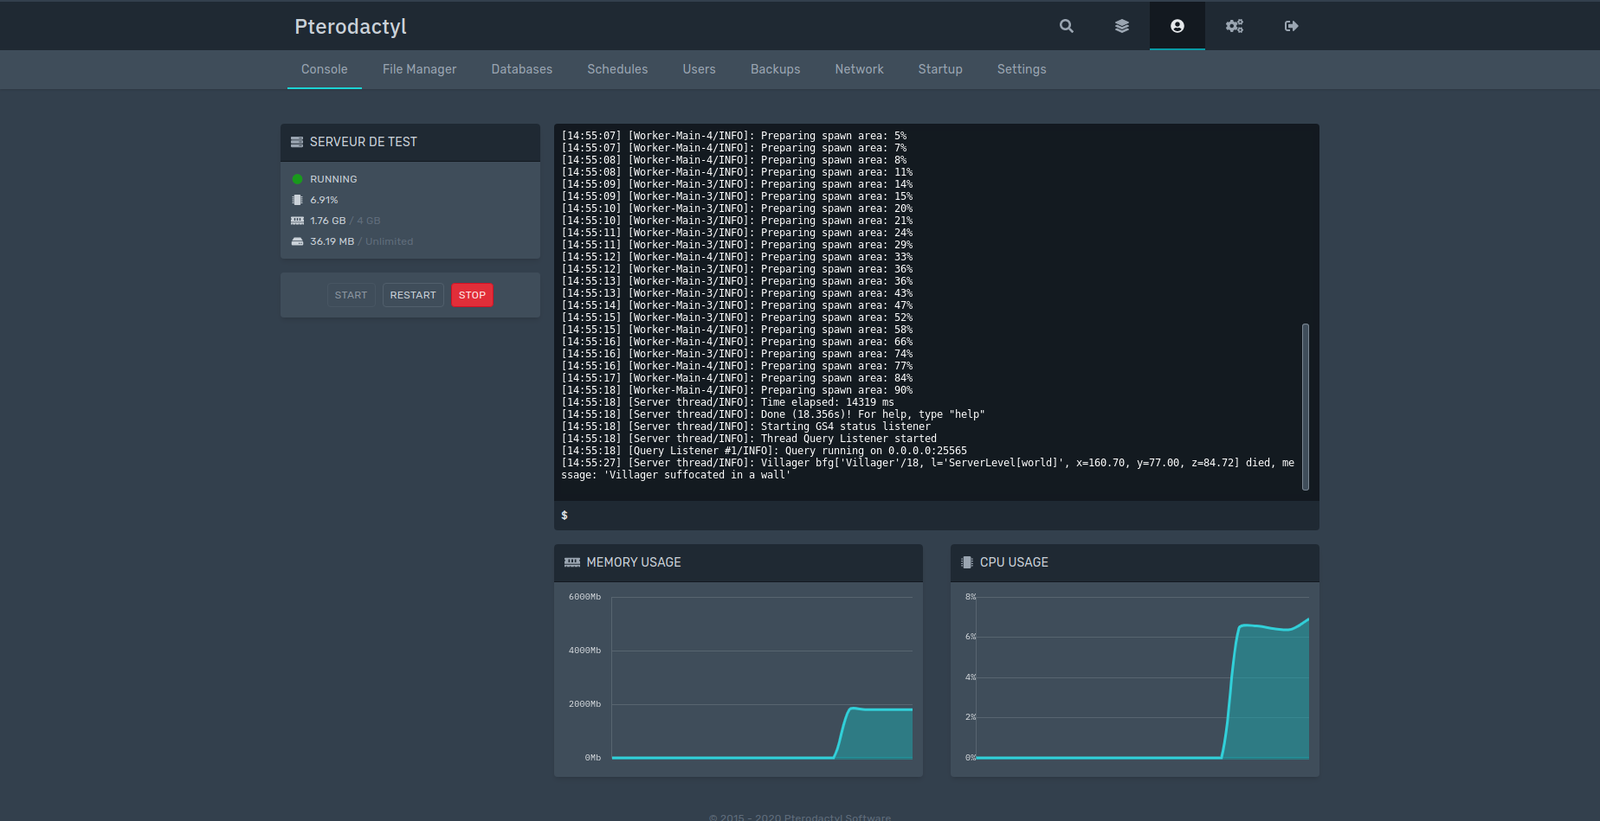
Your game server is ready!
To enter the game server panel, click on the icon:
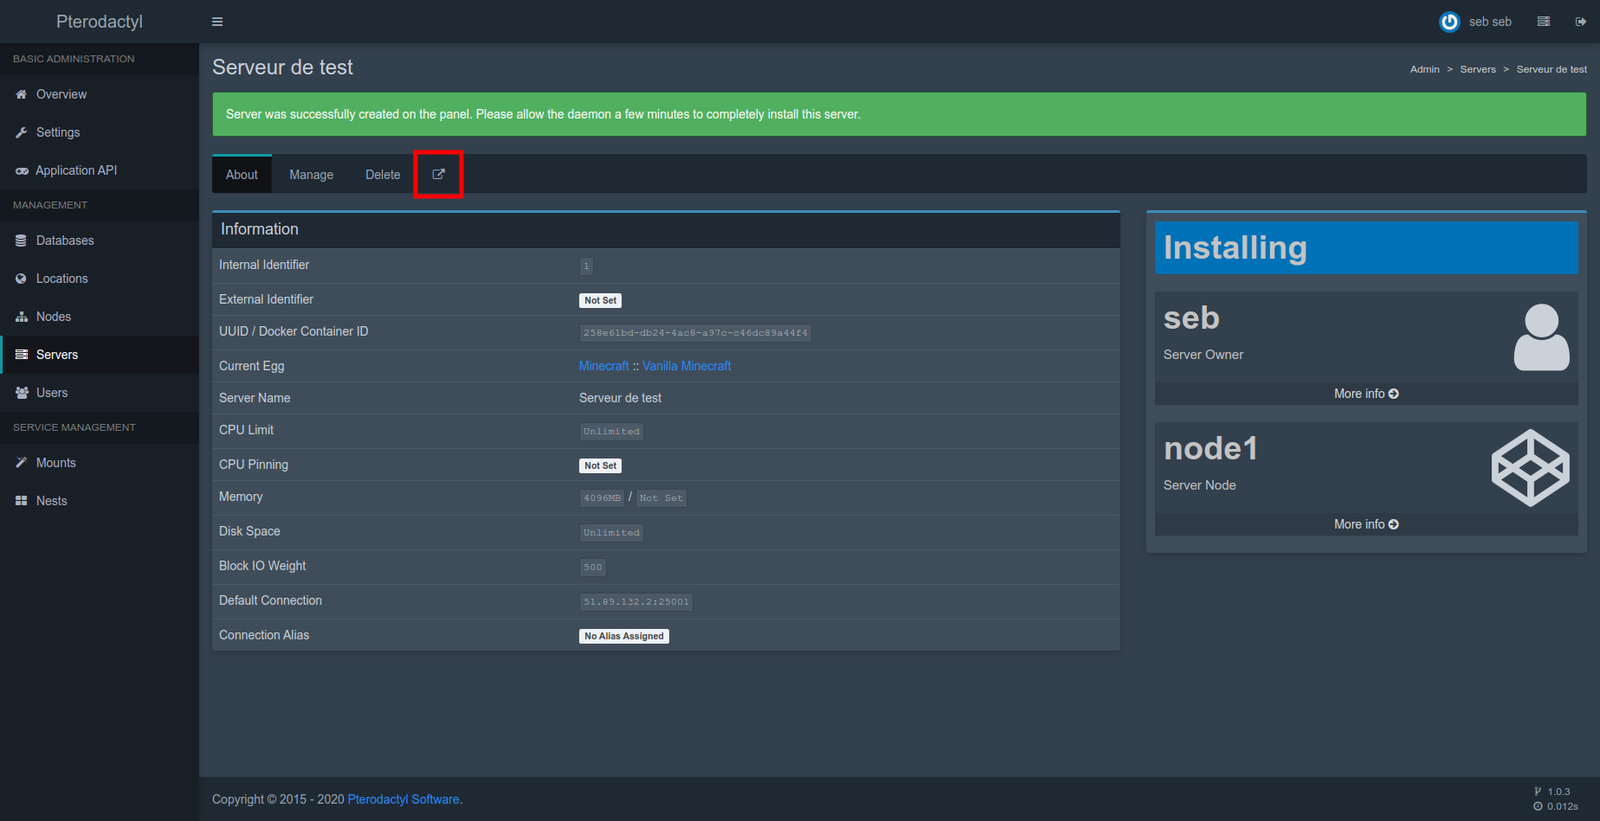
And that's it, you have access to a great panel for your server:
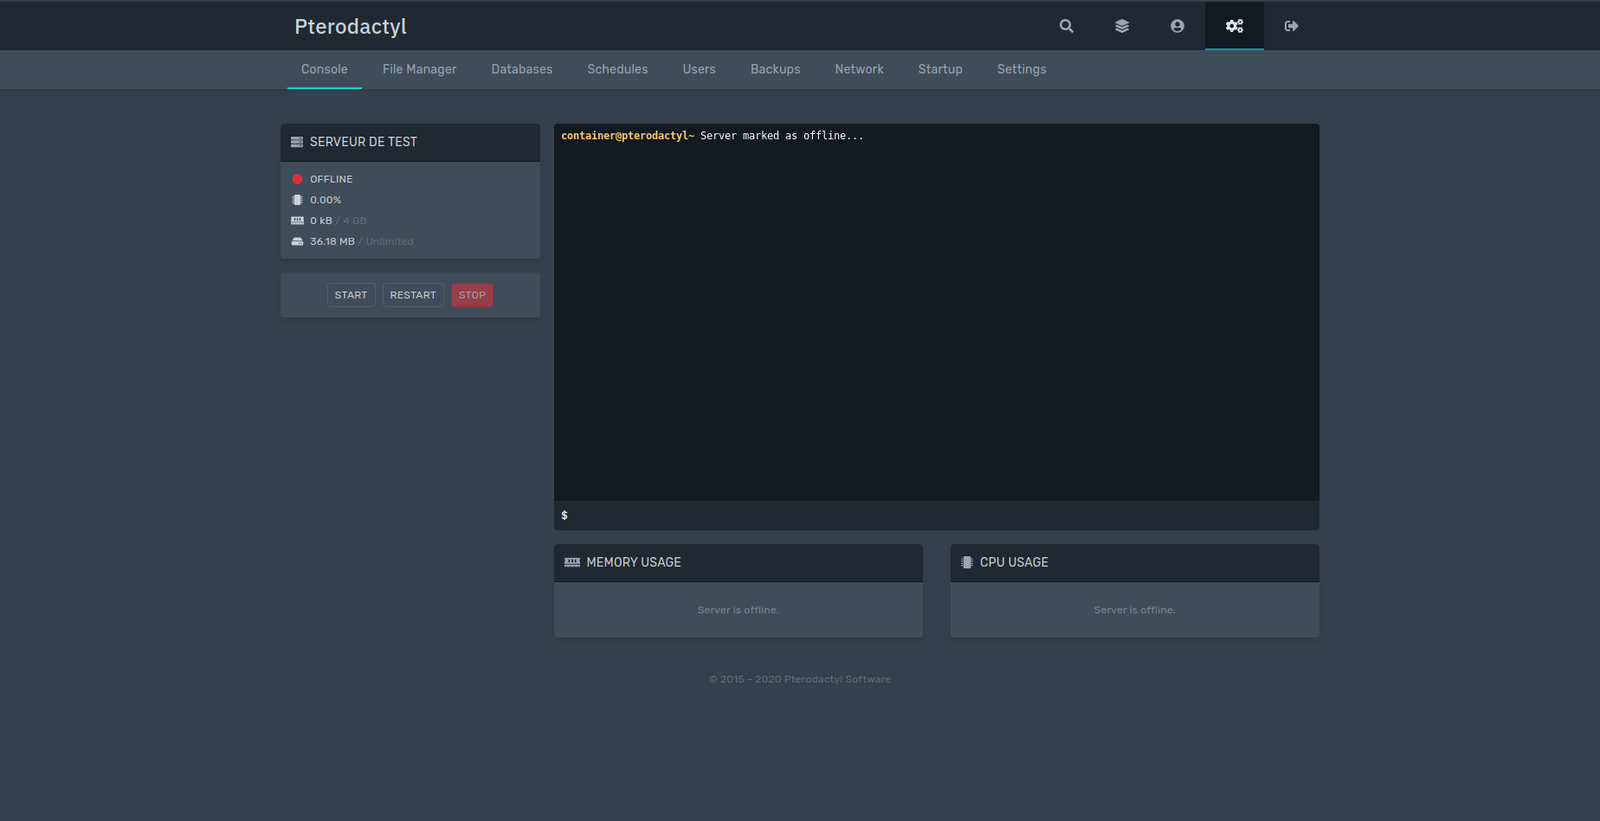
To launch your server, click on Start.
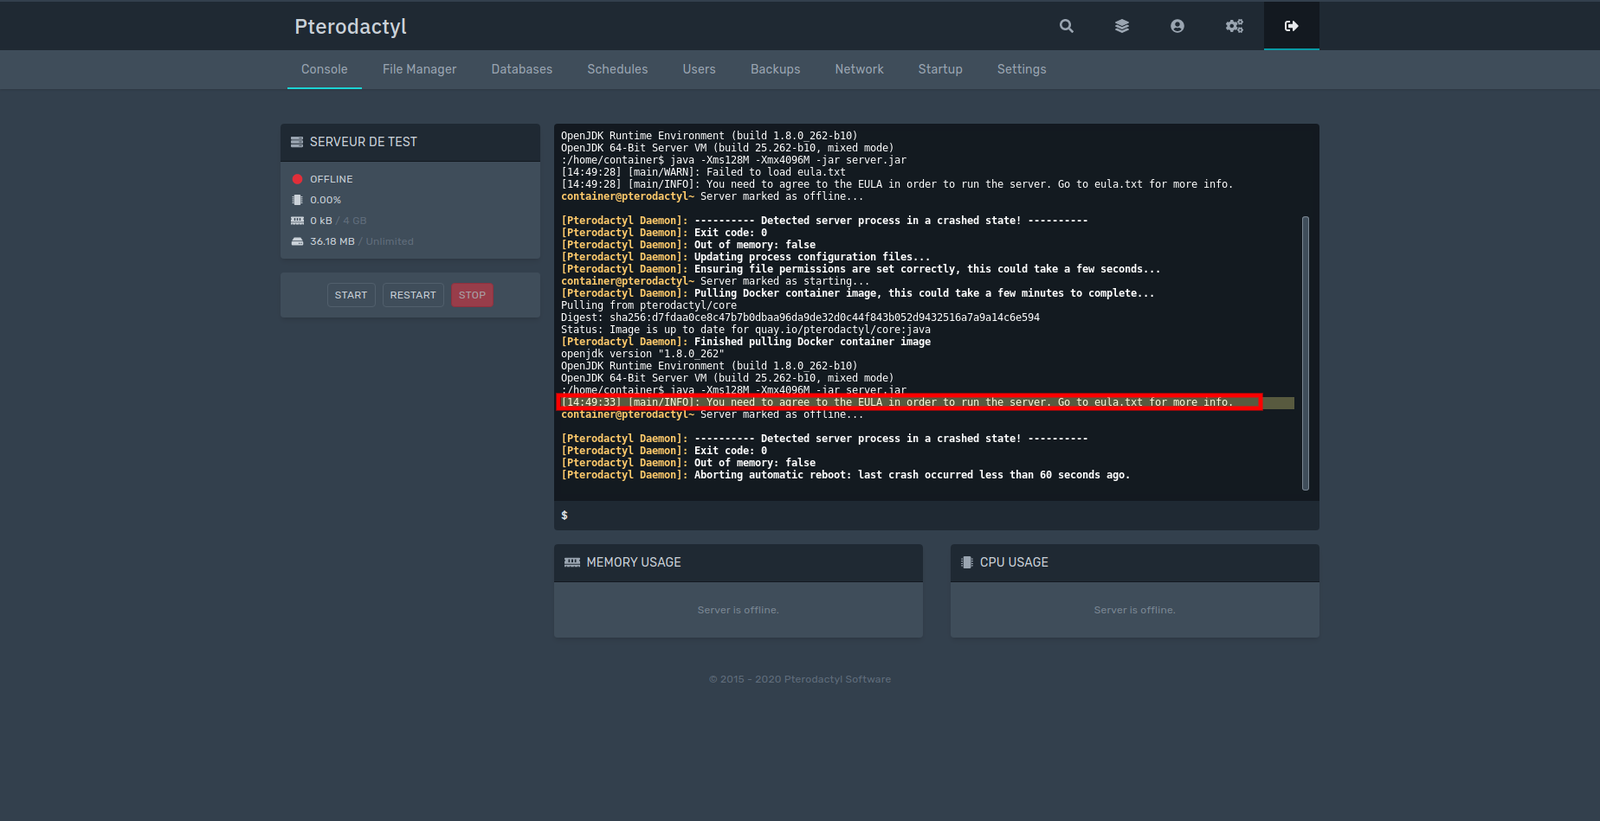
Warning: in the case of a Minecraft server, you must accept the EULA license to be able to launch the server. To do this, launch the server for the first time to generate the files. It should refuse to start:
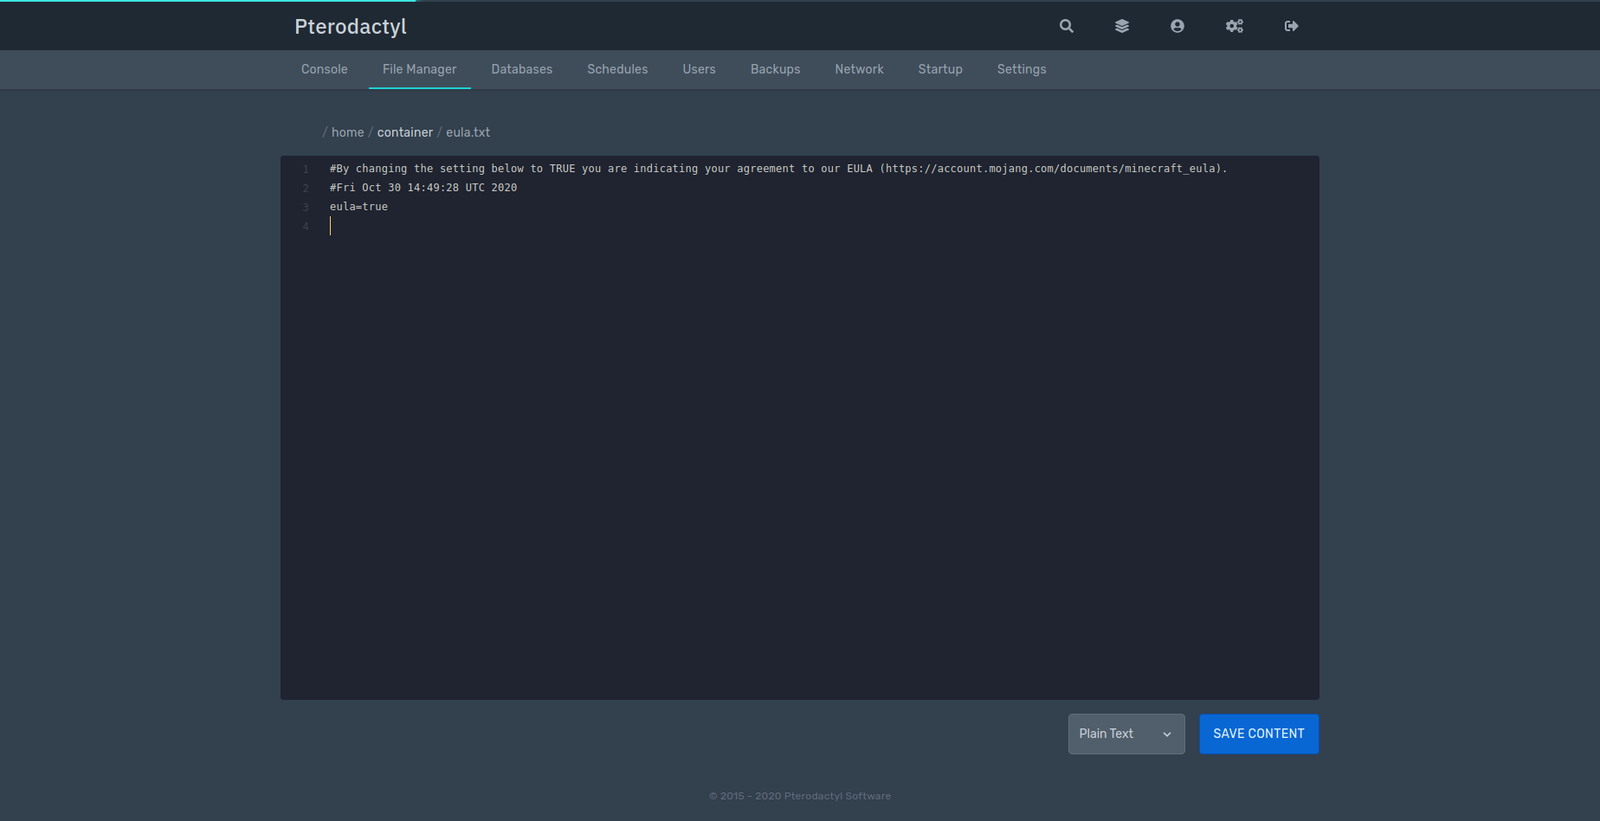
To accept the license
- Go to
File Manager. - Open the file
eula.txt. - Add
eula=true. - Click
Save Content.
All you have to do is restart the server:
Common Errors
If you get a CSRF error when submitting forms, check the contents of the /var/www/pterodactyl/.env file, especially the APP_URL which should contain your http://YOUR_IP address. If the line SESSION_SECURE_COOKIE is present at the very end of the file, delete it.
Then clear the cache:
su -l www-data -s /bin/bash
cd /var/www/pterodactyl
php article clear:cache
Go further
Many features are present in Pterodactyl, from an API, to themes, SSL, eggs, etc.
For more information, see the official documentation, and the guide about the SSL activation.
Enjoy ! ;)