In this guide on how to create an ARK server, all points are discussed: install mods and plugins, change the map, change the cycle day/night, customize the level of players and monsters, here are some of the topics covered.
Whether you are a beginner or an expert, offer an ever more original game experience to your players. ARK supports the modding, allowing you to change any behavior in the game. You can choose to download and install mods from the community (like TotalConversion) or create your own mod!
How to create an ARK server
First of all, be aware that you can launch an ARK server on Linux or Windows. The game is not the most optimized in the world, and the server version does not make miracles. To launch your own server, you will need significant power.
Before you start, ask yourself what your needs are. If you want to make a private ARK server to play with some friends, the power will be less critical than if you're going to make a public server to create a community, for example. And the purchase price of your server will also be higher, as mentioned above, the game is hefty in CPU and RAM resources.
Also, to create a server that will be accessible from the Internet, you will need a lot of bandwidth.
Our ARK Server Hosting services allow you to ignore these many constraints, allowing you to focus on creating content for your players! If you are not convinced yet, you can try it for free.
- Go to the dedicated page: ARK Hosting.
- Get your server.
- The ARK server will be ready in few seconds.
Setting up your server is quite fast. ;)
How to Configure an ARK server
Let's go to the configuration of our ARK server. The difficult part!
In this tutorial, we will deal with the most essentials points to start with your ARK server. We'll start with the general configuration of your server and add administrator rights to be able to execute all commands. Then we'll see how to use a custom a map on your server.
General Configuration (GameUserSettings.ini)
Let's start with the general configuration of the ARK server. The first thing you need to know, it is done by editing the file ark/ShooterGame/Save/Config/LinuxServer/GameUserSettings.ini and ark/ShooterGame/Save/Config/LinuxServer/Game.ini.
In these files, you can change many settings, such as server name, welcome message, max player number, add a login password to the server, change the administrator password (RCON), enable hardcode mode, change the day/night cycle, set up chat and more!
The format used in files is INI (like all configuration files in the game). The content must look like this:
[ServerSettings]
ServerAdminPassword=b31894fa1b3e
ServerPassword=

[MessageOfTheDay]
Message=Welcome on your ARK server by mTxServ.com, happy dinos hunting !!!
Duration=25

[SessionSettings]
SessionName=mTxServ.com - ARK Survival Server

[/Game/PrimalEarth/CoreBlueprints/TestGameMode.TestGameMode_C]
bServerGameLogEnabled=True

[/Script/Engine.GameSession]
MaxPlayers=10
Are you finished with the wizard? To change settings benefits, go to Configuration on the management panel. In this module, two tabs are available, General Configuration and Advanced Configure. Feel free to browse the different options ;)
Don't forget to restart your ARK server to run the new settings after changing the configuration.
Here is a list of all the configuration settings you can edit in the files Game.ini and GameUserSettings.ini:
How to become administrator
An in-game command system is available to manage your ARK server. To use administrator commands, you must have the necessary rights.
To become an administrator on your ARK server, go to the server files. You can use WebFTP in your management panel (click on Files & FTP).
Create (if necessary) the file ark/ShooterGame/Saved/AllowedCheaterSteamIDs.txt and add in the list of Steam64 to which you want to grant administrator rights (one per line).
Changes will be taken applied when the server restarts. To find out about our complete ARK administration management tutorial: How to add an administrator on an ARK server.
Commands
Here is the list of available commands in play. Adding the prefix cheat at the beginning of the command is required for a dedicated server (for local use enter the command directly).
To see the list of commands, go here.
Game.ini File
1 - Start these three command lines first (recommended for proper operation of the file)
[/Script/Engine.HUD]
DebugDisplay=AI
DebugDisplay=collision
A complete list of Engrams is available at the bottom of the tutorial.
Here is the complete command line:
OverrideEngramEntries=(EngramIndex=102,EngramHidden=false,EngramPointsCost=15,EngramLevelRequirement=30,RemoveEngramPreReq=false)
or
OverrideNamedEngramEntries=(EngramClassName="EngramEntry_Saddle_Stego_C",EngramHidden=false,EngramPointsCost=15,EngramLevelRequirement=30,RemoveEngramPreReq=false)
Commands details:
OverrideNamedEngramEntries- informs the system that you will modify an engram.EngramClassName- here you will indicate the name of the engram to modify.EngramHidden=false- this command is optional, if you specify "true" the engram will not be visible to players.EngramPointsCost=15- this command is optional. You will choose the number of points needed to learn the engram.EngramLevelRequirement=30- this command is optional. You will set the level required for the character to learn the engram.RemoveEngramPreReq=false- This command is optional. Here you will activate or disable the requirement to learn a pre-required engram allowing to unblock the plan (e.g., learn how to make straw before switching to wood, etc...). You cannot change a precondition (choose a different engram from the initial engram).
For example, if you want to hide the engram of the Stegosaurus saddle you have to put this:
OverrideNamedEngramEntries=(EngramClassName="EngramEntry_Saddle_Stego_C",EngramHidden=true)
OverrideNamedEngramEntries=(EngramClassName="EngramEntry_Saddle_Stego_C",EngramLevelRequirement=10)
3 - Following the update 231 which at the remaining level of the detained dinos, you can add the following lines so that you can cancel this reset to recover the original configuration:
PerLevelStatsMultiplier_DinoTamed_Add[0]=0.0
PerLevelStatsMultiplier_DinoTamed_Add[8]=0.0
PerLevelStatsMultiplier_DinoTamed_Affinity[0]=0.0
PerLevelStatsMultiplier_DinoTamed_Affinity[8]=0.0
PerLevelStatsMultiplier_DinoTamed[0]=0.0
PerLevelStatsMultiplier_DinoTamed[8]=0.0
How to adjust the day duration of a server
Time cycle management, one of the most difficult values to set on a server, yet the method is almost the same as to adjust the difficulty. Basically, a full day (day/night) lasts 24 minutes on your server. This value is the number of 1. I know that sounds weird, but please, keep that in mind.
Adjusting the day duration:
- Edit the file
/shootergame/saved/config/LinuxServer/GameUserSetting.inifrom your ARK server. - Add the following lines after
[ServerSettings]if you have not already done so:DayCycleSpeedScale=1.000000 NightTimeSpeedScale=1.000000 DayTimeSpeedScale=1.000000DayCycleSpeedScale- This is the cycle of a full day, therefore DAY+NIGHT. Set on 1 as above, the day lasts 24 minutes.NightTimeSpeedScale- Night time speed.DayTimeSpeedScale- Day time speed.
We'll see now how to extend the day from 24 minutes to 60 minutes. It is a reverse cross-multiplication that must be done:
(a / b) * c
a= 1b= The length of your day in minutesc= 24
(1 / 60)*24 = 0.400000
DayCycleSpeedScale and your day will last one hour.But now in 1h of play, the time of night and day is always the same except that they are based on 1h. You will, therefore, have 30 minutes at night and 30 minutes by day.
To change that we will use the same process once again.
Night Duration
(a / b) * c
a= 1b= The length of the day required (In our case, we will say 20 minutes).c= Half a day in minutes (30 minutes in this case since we’ve said one day per 1 hour).
(1 / 20)*30 = 1.50000
Specify this value in NightTimeSpeedScale.
Day Duration
(a / b) * c
a= 1b= The length of the required day period (In our case, we will say 40 minutes since we already have 20 minutes per night per 1 hour).c= Half day in minutes (30 minutes in this case since we’ve said one day in 1 hour.
(1 / 40)*30 = 0.750000
Specify this value in DayTimeSpeedScale.
DayCycleSpeedScale=0.400000
NightTimeSpeedScale=1.500000
DayTimeSpeedScale=0.750000
How enable the Spectator Mode
A viewer mode is available on your ARK server. If you have administrator rights on your server:
- To enable viewer mode, enter
cheat enablespectator. - To disable viewer mode, enter
cheat stopspectating.
requestspectator password:- Open the following file:
/shootergame/saved/config/LinuxServer/GameUserSetting.ini. - In the section
[ServerSettings]is the parameterSpectatorPassword.
Add a password and save the file:SpectatorPassword=mtxserv
- Restart the server.
Going Further
- Whitelist management of an ARK Survival Evolved server
- Admins management of an ARK Survival Evolved server
- Customize player and dinos level
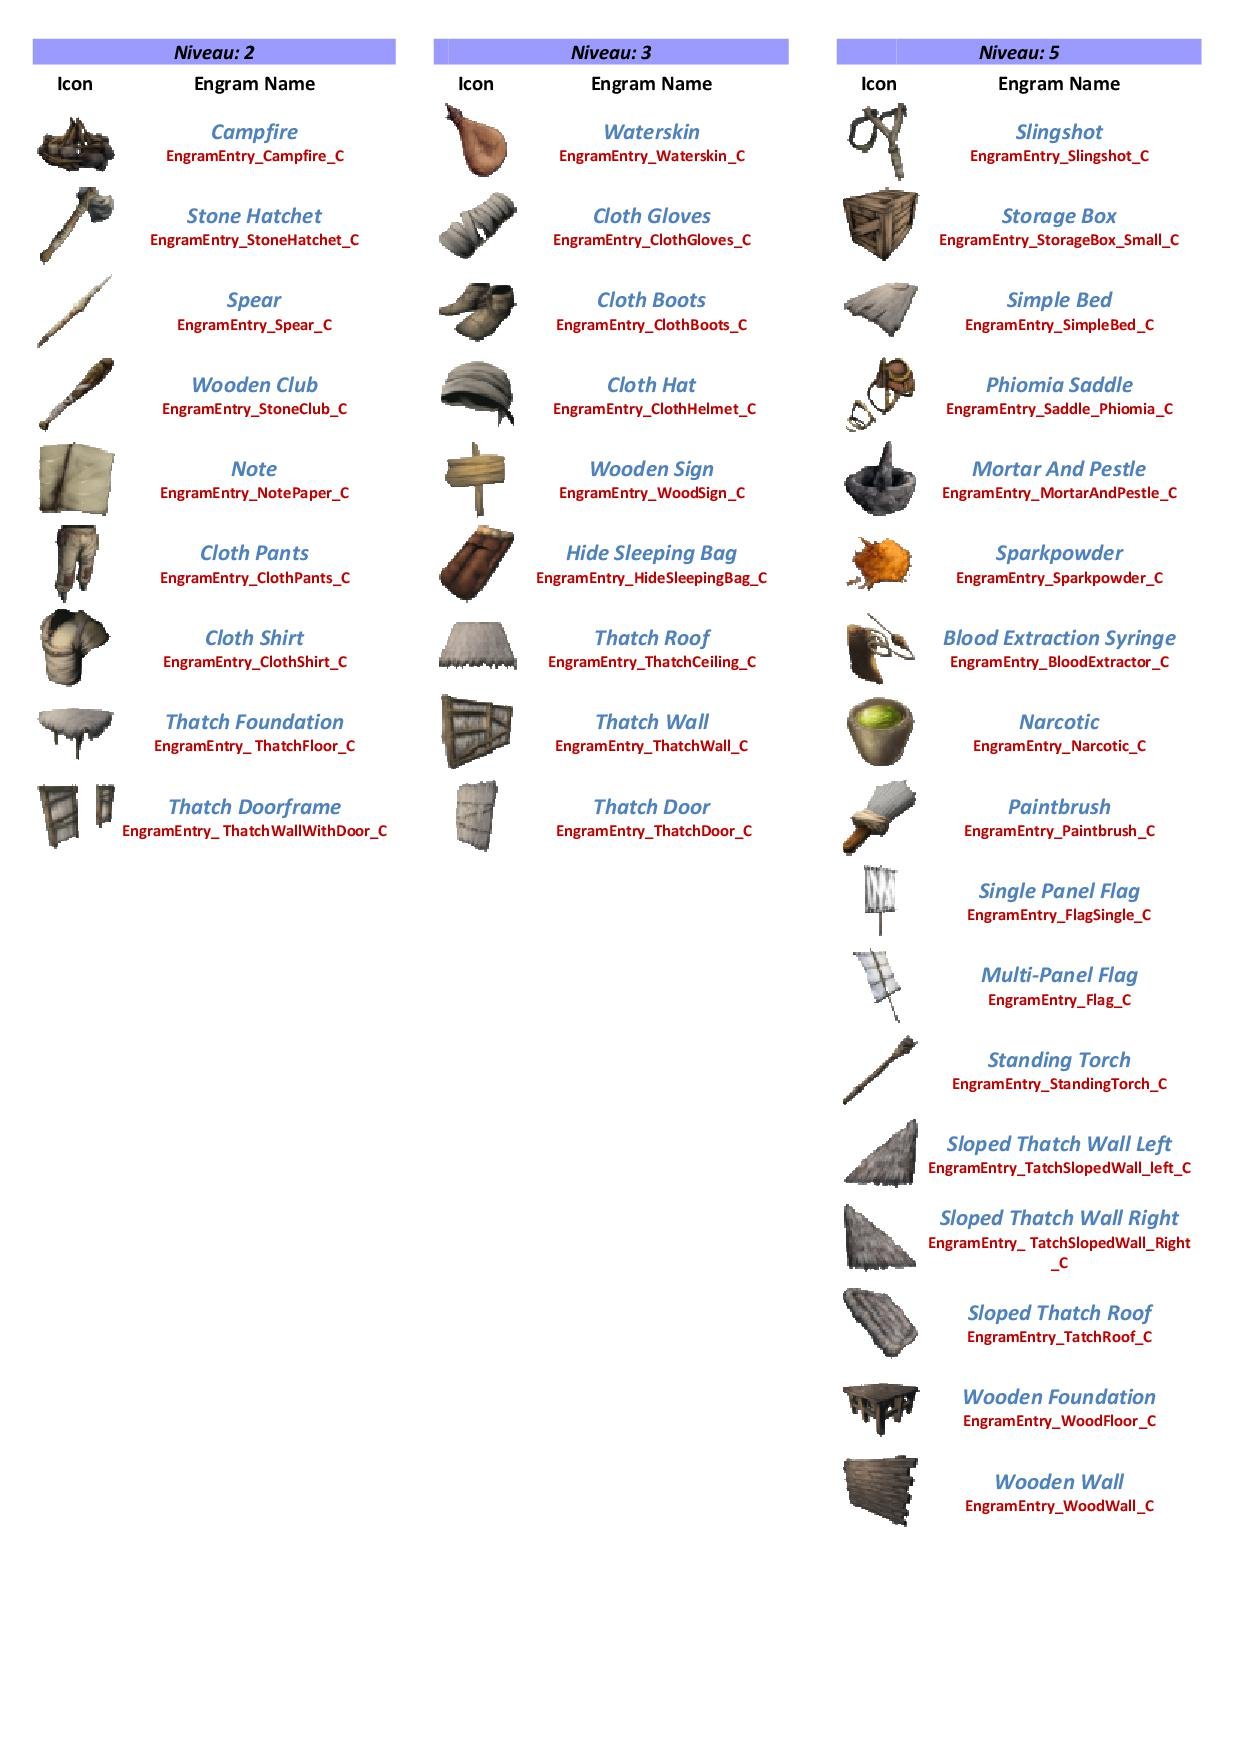
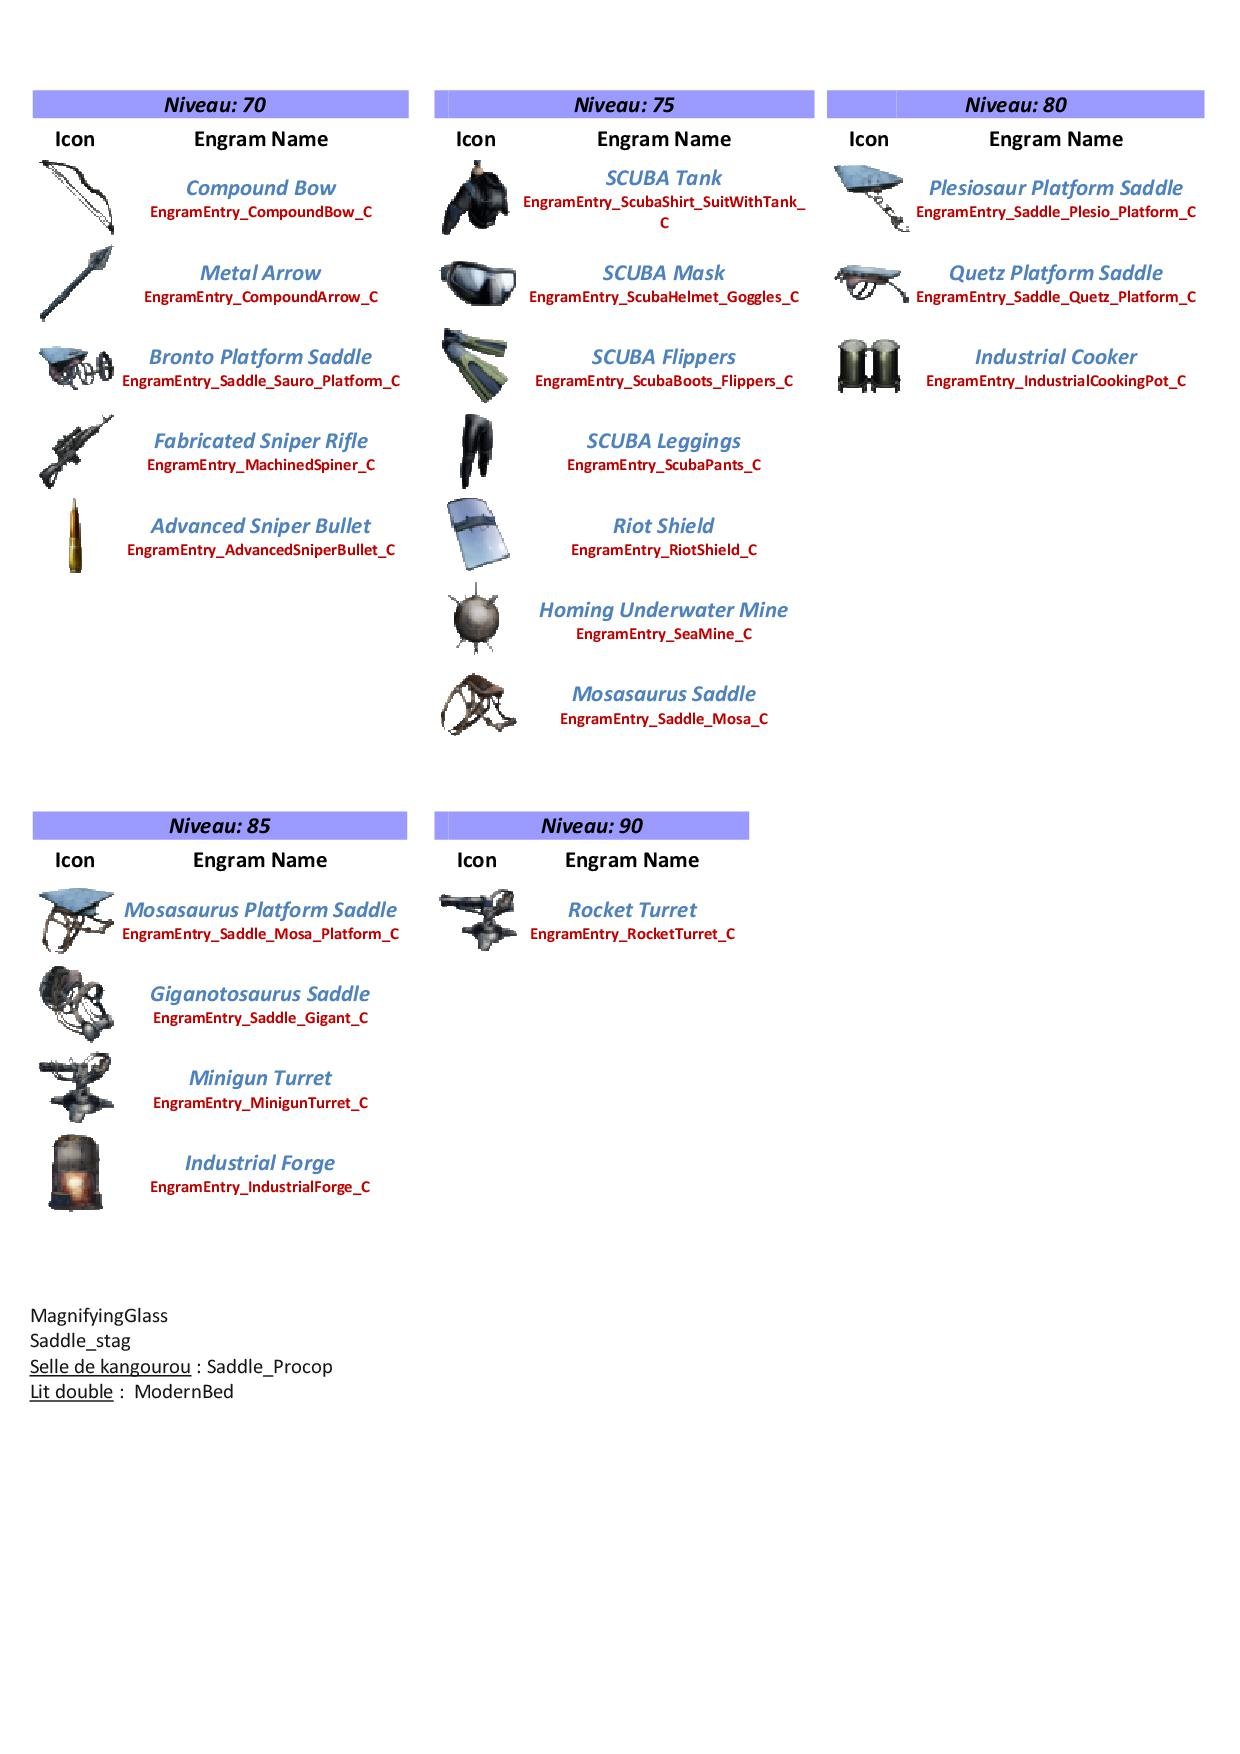
List of engrams names (class name)
We have seen previously with the Game.ini file some examples of command lines to hide engrams from the player list.
For these commands to work correctly, you need to enter the exact name of each, which is often different from the one it carries in our in-game lists.
Here is the complete list of engrams names registered by game developers: